No-bake pumpkin mini cheesecakes layer a graham cracker crust with a cream cheese and pumpkin filling. Powdered sugar, vanilla, pumpkin pie spice, and lemon juice season the mixture, which chills before serving. Whipped cream is added at the end.
The filling needs at least 2 hours in the refrigerator, so plan for chilling rather than treating this as an immediate dessert. Individual dessert cups are a practical way to serve the soft filling. Jump to the recipe card for the quantities and complete method.
How These No-Bake Pumpkin Cheesecakes Set
The recipe combines cream cheese with pumpkin puree and chills the mixture instead of baking it. There is no egg or gelatin in the listed ingredients. The final texture is a chilled, creamy dessert rather than a promise of firm slices like a baked full-size cheesecake.
The crumb base uses melted butter to bind crushed graham crackers. Press it into the individual containers before adding the filling so the layers remain separate. Cup size affects the number and depth of portions, so no fixed yield should be assumed from the word mini.
No-Bake Pumpkin Mini Cheesecake Ingredients
- 1 cup crushed graham crackers
- 1/4 cup melted butter
- 2 cups cream cheese, softened
- 1 cup pumpkin puree
- 1/2 cup powdered sugar
- 1 teaspoon vanilla extract
- 1 teaspoon pumpkin pie spice
- 1 tablespoon lemon juice
- Whipped cream (for topping)
Cream Cheese and Pumpkin Notes
The cream cheese amount is listed in cups. Measure the stated amount rather than assuming a particular number of packages. Let it soften enough for mixing, following the product’s handling directions, and keep the finished dairy dessert refrigerated.
Use pumpkin puree rather than sweetened pumpkin pie filling. Homemade puree can vary in moisture; very watery puree changes the filling. The measured pumpkin pie spice supplies the seasoning, while powdered sugar sweetens without requiring a separate cooked syrup.
How to Make No-Bake Pumpkin Mini Cheesecakes
1. Mix the Crumb Crust
Combine the crushed graham crackers and melted butter until the crumbs are coated. Divide among mini dessert cups or suitable muffin-tin portions and press into the bases. Keep the layer even rather than packing one container much deeper than the others.
2. Smooth the Cream Cheese
Beat the softened cream cheese in a separate bowl until smooth. Scrape the sides and bottom so firm pockets do not remain beneath the mixture. Starting with smooth cream cheese makes it easier to incorporate the pumpkin without leaving lumps.
3. Add Pumpkin and Flavorings
Add the pumpkin puree, powdered sugar, vanilla, pumpkin pie spice, and lemon juice. Beat until combined and smooth. Scrape the bowl again to make sure the seasonings and puree are distributed rather than leaving a dense layer around the edges.
4. Fill and Chill
Spoon the filling over the prepared crusts and smooth the tops. Cover appropriately and refrigerate for at least 2 hours, until chilled and set enough for serving. Larger or deeper portions may need more time; refrigeration is part of the preparation, not an optional garnish step.
5. Finish Before Serving
Add whipped cream close to serving. Offer the portions straight from the refrigerator with spoons. If using muffin tins, choose a suitable lined format and assess whether the filling is firm enough to lift; dessert cups avoid relying on a clean unmolding result.
Tips for Smooth Filling and Neat Portions
Measure the puree and cream cheese carefully. A watery puree or a casually guessed cream cheese amount can change the consistency. Keep the listed proportions as your reference before experimenting with other ingredients or larger portions.
Press the crust enough to form a base without making it so compact that it is difficult to eat with a spoon. Individual cups vary, so spread the mixture across the containers before pressing firmly into each one.
Give the filling its full chilling time. More mixing does not replace refrigeration, and adding whipped cream over a warm filling does not make it set. Prepare the dessert early enough that you can serve it chilled rather than rushing it to the table.
Serving and Storing the Mini Cheesecakes
Individual cups show the crumb and pumpkin layers clearly and simplify serving. A small sprinkle of spice or crumbs is optional decoration. This dessert is spoonable, so provide utensils rather than presenting soft filling as a mess-free finger food.
Keep leftovers covered in the refrigerator. The crust can soften as it absorbs moisture from the filling, so expect some texture change during storage. Add whipped cream when serving if possible rather than repeatedly handling the finished toppings.
For a warm pumpkin drink, try a homemade pumpkin spice latte. For another individual dessert, see the chocolate frosting brownie parfaits. Both provide other ways to plan portions for a gathering.
Frequently Asked Questions
Can I use homemade pumpkin puree?
Yes, but its moisture matters. Use a puree appropriate for the filling rather than adding a very watery mixture and expecting the same texture.
Can I make the crust gluten-free?
Choose suitable graham-style crumbs and verify the remaining ingredients and toppings. Check labels rather than assuming the whole dessert is suitable after one substitution.
Can I prepare them in advance?
Yes. This recipe already requires chilling. Keep the portions covered and refrigerated, and finish with whipped cream near serving.
No-Bake Pumpkin Mini Cheesecakes Recipe Card
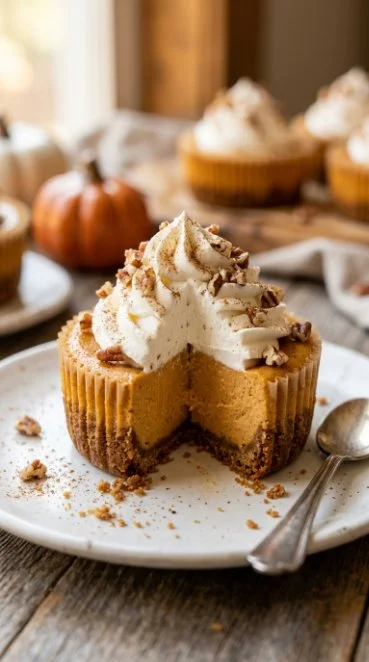
No Bake Pumpkin Mini Cheesecakes
Ingredients
Method
- In a bowl, mix the crushed graham crackers with the melted butter until combined.
- Press the mixture into the bottom of mini dessert cups or muffin tins to form the crust.
- In another bowl, beat the cream cheese until smooth.
- Add the pumpkin puree, powdered sugar, vanilla extract, pumpkin pie spice, and lemon juice. Beat until smooth and well mixed.
- Spoon the pumpkin mixture over the crust and smooth the tops.
- Chill in the refrigerator for at least 2 hours, or until set.
- Before serving, add a dollop of whipped cream on top of each cheesecake.